|
|
|
THE KEYKODE STORY and Beyond......

The
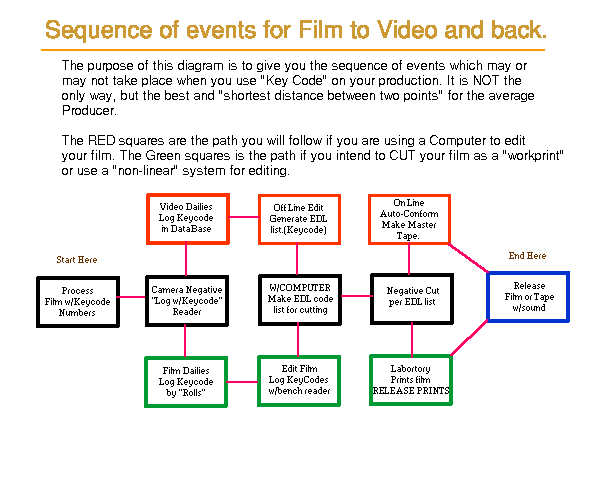
sequence above does not cover all necessary steps.
IF you intend to release on FILM and Make a VIDEO transfer OF the CUT film, then the video tape above should have the KeyCode "burned-in" AT the video transfer. This will carry the KeyCode through editing, no matter what VIDEO editing system you use! At best, someone can "log" the Keycodes from the finished edited video tape.
IF you intend,
to only "Auto-assemble" to VIDEO tape, then the Keycode is only there
if on some future date, you MAY cut your Negative for FILM Release. BUT, you
must make a COPY of the master tape, and THAT copy will have the Keycode Burned-in
along with the SMPTE time code. The Master tape will have ONLY the SMPTE time
code(s) in an "address" track and the picture "clean". (without
ANY numbers visible)
The above will
"protect" your master tape.
However, IF
you want PRICE and speed on your Film to Video transfer in the "Dailies"
stages of your production, then color correction will not occur at a "cheap"
price!
You will then Cut your Film Negative and transfer the CUT negative, color correct it as you go and make a NEW Master Video Tape. If this IS the case, "put the Burned-in Keycode" on your video transfer. A word about VIDEO Color Correction.... It's not all that is could be and it can be very expensive. If your show has some very badly photographed sequences, colorwise, see if your FILM Laboratory can make you an "Answer-(low contrast) Print" as a good price. The controls for color correction are better ON film then ON VIDEO!
You'll have
to "balance" the prices for both types of correction yourself.
Frames of Video v Film Frames
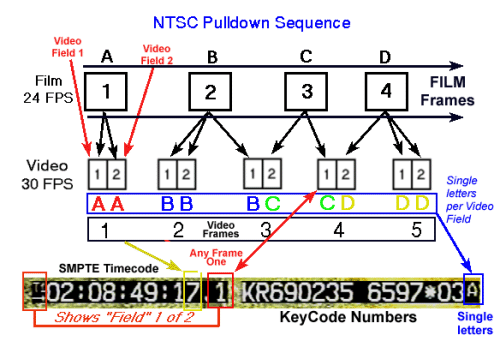
Below is a chart compiled by Eastman Kodak to explain the A-B-C-D letters at the end of the KeyCode readout:

To give some
explanation, there are two(2) Video FIELDS to one VIDEO FRAME. Those are shown
next to the "Video 30 FPS" line on the picture.
If you see a
"C" next to the last KeyCode number, it exists on the film as Frame
3 and VIDEO FIELD 2 of frame 3 and FIELD 1 of frame 4.
The "Counter"
on screen will have a bar below the C in both FIELDS to signify that it is in
"Split" Fields. This only comes into play in negative cutting.
This is because
we must MAKE 5 extra frames of FILM running at 24 FRAMES per SECOND to VIDEO,
which runs at 30 FRAMES per second, and to accommodate this, we must "Scan"
extra film frames in any given second.
This is done
by "scanning" extra copies of this film's frames into VIDEO FIELDS.
The 3-2-2 system does just that or 4-2-2 system.
The Telecine
machine scans and puts to VIDEO extra copies of the film's fames as shown above.
Let's look at the "A" FILM FRAME first:
As above the Telecine machine puts two copies of the 1st film frame to two FIELDS of the video frame. Perfect copy.
But, on the
"B" FILM FRAME, the second FILM Frame, the Telecine machine puts,
again two copies of the 2nd Film frame to the two FIELDS of the video frame
AND one extra copy to the 1st FIELD of the 3rd Video Frame.
It then Copies,
for "C", to the second of the 3rd video FIELD, a another copy of 3rd
FILM to the first video Frame to the 4th Video frame, and the last of the 4
FILM frames is copied to the Second FIELD of the 4th video frame and the to
both FIELDS of the 5th video frame.
What happens:
you get 5 Video FRAMES from 4 FILM FRAMES, if you multiply that out, you're
getting 24 frames of picture PER SECOND copied to 30 FRAMES of video PER SECOND
without changing their TIME.
In this program, because we cannot use the C , we use lowercase letters instead,
the program uses these for B C and D frames as b c d.
Synch Adjusting
Because
of disparaging difference between video frames and film frames, it is possible
to cut your negative picture out-of-sync with your sound track. Also, the negative
cutters use a "Hot Splicer" to splice their films and you don't.
If
you actually cut a "Work Print" in a cutting room, you would use a
"Butt-Splicer", which does not loose any frames.
The
hot-Splicer does. So if the Negative cutter splices incorrectly, and must make
another splice he/she will loose two frames in making the new cut.
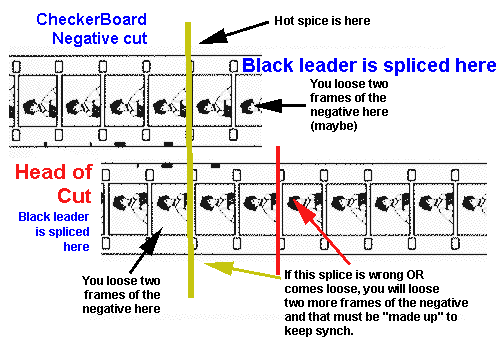
(16mm
"Checkerboard Negative" cut shown below)
IF the back
splice has not been made, he/she will add to the end cut the frames lost in
the front cut but, the "cut" will be out of synch for that cut. For
the most part, the audience is unaware and never sees the picture out of synch
for that single scene.
BUT, if this
happens allot of time the synch goes to hell and the sound track, then must
be re-cut or re-mixed. With the advent of television, the standards for Motion
Pictures for that medium have dropped considerably.
However, IF
the Splicing cement is old, and your splices come loose in the printing process,
you again are in the "out of synch" mode again. If this is the case,
order a "pull-back" of the reel in question, say 100 feet, if 16mm,
as check your synch.
Demand fresh
Cement and you'll have a fresh in-synch picture, always.
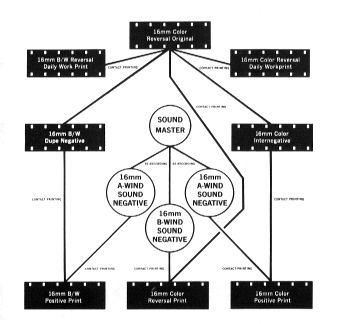
If you are printing
16mm "Camera Negative" your sound track will be "B" wind
negative synched from the HEAD of the reel, thus you'll need a "Head-POP"
to synch the negative.
If you have made a 16mm "Dupe-negative" because you shot in Reversal, you'll need an "A" wind negative and it is synched from the tail of the negative and requires a "Tail-POP".

35mm soundtracks require BOTH head and tail POP's because they can be printed in a bi-direction, but today, are mounted in 3,000 to 10,000 rolls and printed continuously in one direction, for "Platter" mounting in the theaters.
The
synching and mounting will be done by the Laboratory and is of no special interest
here.
Happy Hunting...
From Sample Corporation.
Press
"Back" on your Browser to return to the main page
KeyKode
is a copyright of the Eastman Kodak Company
Copyright 2003 by Sample Corporation-Los Angeles CA


